
Costumes for Cosplay – She-ra
This week the focus of the costume challenge was cosplay.
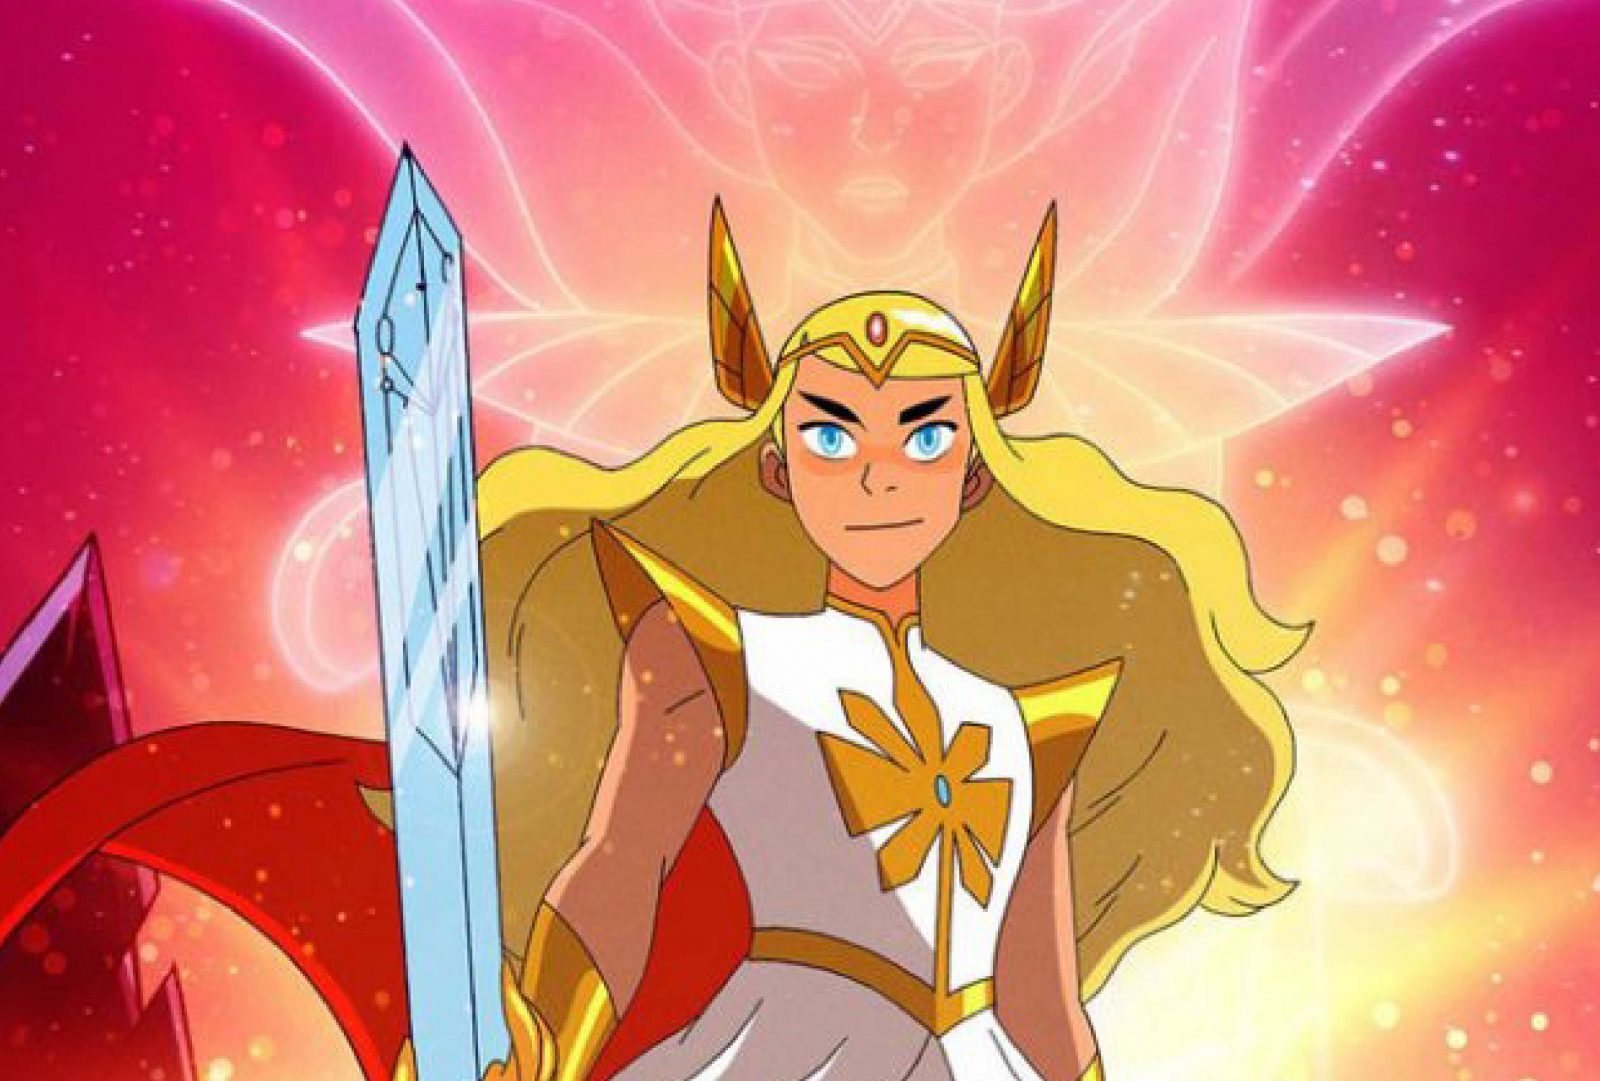
Cosplay is a mashup of the words “costume” and “role play” is the term used for making and wearing costumes at conventions worldwide, whether it is a genre inclusive convention like San Diego Comic Con or a local anime convention like CharlestonCon, which is this weekend, right here in Charleston! The main difference between just wearing a costume and cosplaying is that cosplayers tend to not only bring the look of the character into the costume, but a lot of times like to pay homage to the character by interacting in character at these events. Cosplay has expanded over the years from just anime characters to western media as well (everything from Star Trek to Disney to My Little Pony). This week, I chose to make She-Ra from the Netflix series She-Ra and the Princesses of Power.
She-Ra Costume
I started by finding a white turtleneck sweater, a pair of white shorts, a panel of sheer white curtains, a red blanket, and a pair of boots from Goodwill.
The other pieces I used to make the costume were a piece of gold vinyl I had but any gold fabric or piece of vinyl with a finishing touch of gold spray paint will work (about ½ yard in length), two red gems and one blue gem, a strong glue called E-6000, a piece of newspaper, some aluminum floral wire, some white, blue, and gold, acrylic paint, a can of white spray paint, black fabric paint, two small hair combs/clips, 1-2 inches of fishing line, hot glue, and stitch witchery.
I began by removing the sleeves from the shirt and pinning the shoulders to where I wanted them to start. I used hot glue to ensure the fold would stay put where I wanted it by adding the glue in the fold. I then used the E-6000 to glue two gold strips to the shorts. I cut out a pattern for the Star shape I was using on the chest of the costume using the newspaper; it took a couple of tries before I was happy with the shape of the star. I then traced the star onto my vinyl and traced out the shape of the neck piece and the line connecting it to the belt piece and cut the piece out (you can do these all as separate pieces and layer the pieces on top of each other for a similar effect).

I then used the E-6000 to glue the vinyl piece (except for the belt part) in place, using pins to hold the vinyl where I wanted it while the glue was drying. I only glued the neck piece about halfway around the turtleneck to ensure I would still be able to put my head through the neck hole, and then I later added velcro to the neck to ensure they close once the costume is in place. For the sleeve pieces, I cut out 4 identical arch shapes and glued them together.
I then used the glue (E-6000 or Hot glue) to place the shoulder pieces on the shoulders where I wanted them to stay and hold them in place while they dried. I wrapped the newspaper around my wrists and drew out the shape of the gauntlets, cut them out of the vinyl, and added Velcro to the sides of the gauntlets. Before I glued down the belt piece, I made the skirt piece to add to the top.
I folded my curtains in half and cut out 3 skirt shapes from the curtains (you can use a skater skirt you have to trace the shape on the curtains to make sure it is the right shape). I then sewed the three pieces together into one long piece and hemmed the bottom and edges of the piece.

I then hand gathered the top part of the skirt by using one long stitch and pulling the fabric into a long gathered piece the length of my waist. I then pinned the piece to the shirt (which I had cut into the shape I wanted it) and hand sewed the skirt to the shirt. I put my shirt on my mannequin and made sure the hem of the skirt was where I wanted it to be and made adjustments to the length accordingly (making the skirt just short of the shorts).
I then glued the belt part on top of the seam, gluing it about half way, and added velcro to the ends so I can fit the belt to my waist when I wear it. I added a running stitch to the top of the blanket like I did for the skirt and hand tacked the piece between the shoulder pieces on the shirt to make the cape. The finishing touch of this part of the costume was adding the blue gem to the center of the star (I added more gems for detailing, but that is an extra detail I just wanted to do).
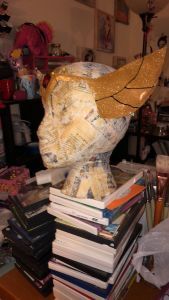
For the head piece, I shaped the floral wire into a v and cut it to the length I wanted it to be. I then traced around the shape on my vinyl and cut two matching pieces out. I hot glued the pieces together, sandwiching the floral wire between them. I also sandwiched a small piece of fishing line in the V as well, so I could suspend my gem in the crown. Once the hot glue was dry, I glued two red gems on the fishing line with hot glue. Cut out 4 wing shapes for the side of the head piece and two matching triangles of the floral wire to make sure they kept their shape. I glued the wire between two pieces of the wings to make sure they kept their shape and then glue the wings to the head piece. I added additional detailing to the wings with black fabric paint.
Finally I added two combs to the back of the head piece to make sure the crown would stay in place while wearing the costume.
For the boots, I found a couple of reference pictures for the boots. I cut the boots into the shape I wanted at the top (using hot glue to affix the front and lining to each other). I then sprayed painted the boots white and came in with acrylic paint to add detailing to the boots. I added a couple of layers to the boots for opacity. This completed the costume.

Finally I chose to make the sword, which is an optional detail if you don’t want to do the construction of the sword. I built the sword based off of a paddle I found at Goodwill. The additional pieces I used were EVA foam (I used black playmats from Walmart or Lowes/HomeDepot), silver and gold metallic spray paint, small dowels, 1 inch ribbon, a Christmas ornament, Mod Podge, fabric paint, and two blue gems.
The tools needed for this project were a drill, a hand sander, a small hand saw, Rubber cement, hot glue, and DAP kwik seal. I began by drilling 3 holes in the top of the paddle. I glued three small dowels the size of the holes and glued the foam (cut to the shape of the top half of the sword) around the dowells with rubber cement (adding a structural piece to keep the foam in place). Once the foam pieces were dried together, I added the DAP (which is a sealant for tiles) to fill in the gaps in the foam where the sword came together and at the seam with the wooden paddle. Once the DAP and glue were both dry, I went outside and used the and sander to sand the foam to the same size as the paddle so they are flush with each other. I had to repeat the Dap and Sand step a couple of times before I was happy with how everything turned out. Please make sure to cover your nose and mouth while you are sanding, the sanded pieces of foam get everywhere and pretty much coat everything in a layer of sanded foam, so it is messy.
Once I was happy with the shape of the sword, I chose to spray everything the same color (so everything would be pretty solid once I finished). I then made the hilt pieces, two largest shapes to go on the front and back, and two smaller pieces to go in the sides, so the piece would all come together solidly with the rubber cement as a bonding agent. I added the pieces to the sword piece by piece (the small side pieces first and then the front and back pieces).
I used the DAP in the seams to make sure everything was solidly one piece. For the criss-crossed grip, I added pieces of ribbon, criss-crossing them and gluing them in place with hot glue. Once that was all finished, I added a couple layers of Glossy Mod Podge to the front and back of the sword, doing this helps to give a more metallic finish to the sword once finished. I added detailing to the sword with black fabric paint. For the round part of the grip, I cut a plastic Christmas ornament in half and hot glued it to the bottom of the paddle. I sprayed painted the sword, silver for the blade and gold for the hilt/grip. Lastly, I added the blue gem and detailing to the sword, finishing the costume completely.


Once completed, all of these costumes will look right at home and any convention but will also make good Halloween costumes for the season! If you choose to come to CharlestonCon this weekend, we want to see your costumes! For more details about CharlestonCon, visit https://www.charlestoncon.com. For more of my costumes, visit http://facebook.com/shelbeaniecosplay. Hope to see you guys soon!


