
DIY Turkey Day Crafts
Turkey day is almost here, and you know what that means… it’s time to feast! Whether you’re visiting family or hosting your own Thanksgiving dinner, we’ve got three fun and inexpensive crafts that pair perfect with the occasion. Make something special for yourself and your guests, or gift one of your creations to your gracious host. The best part? You can keep it simple and sweet (like us!) or get as fancy as you’d like. Either way, these DIY crafts are sure to compliment any Thanksgiving dinner.
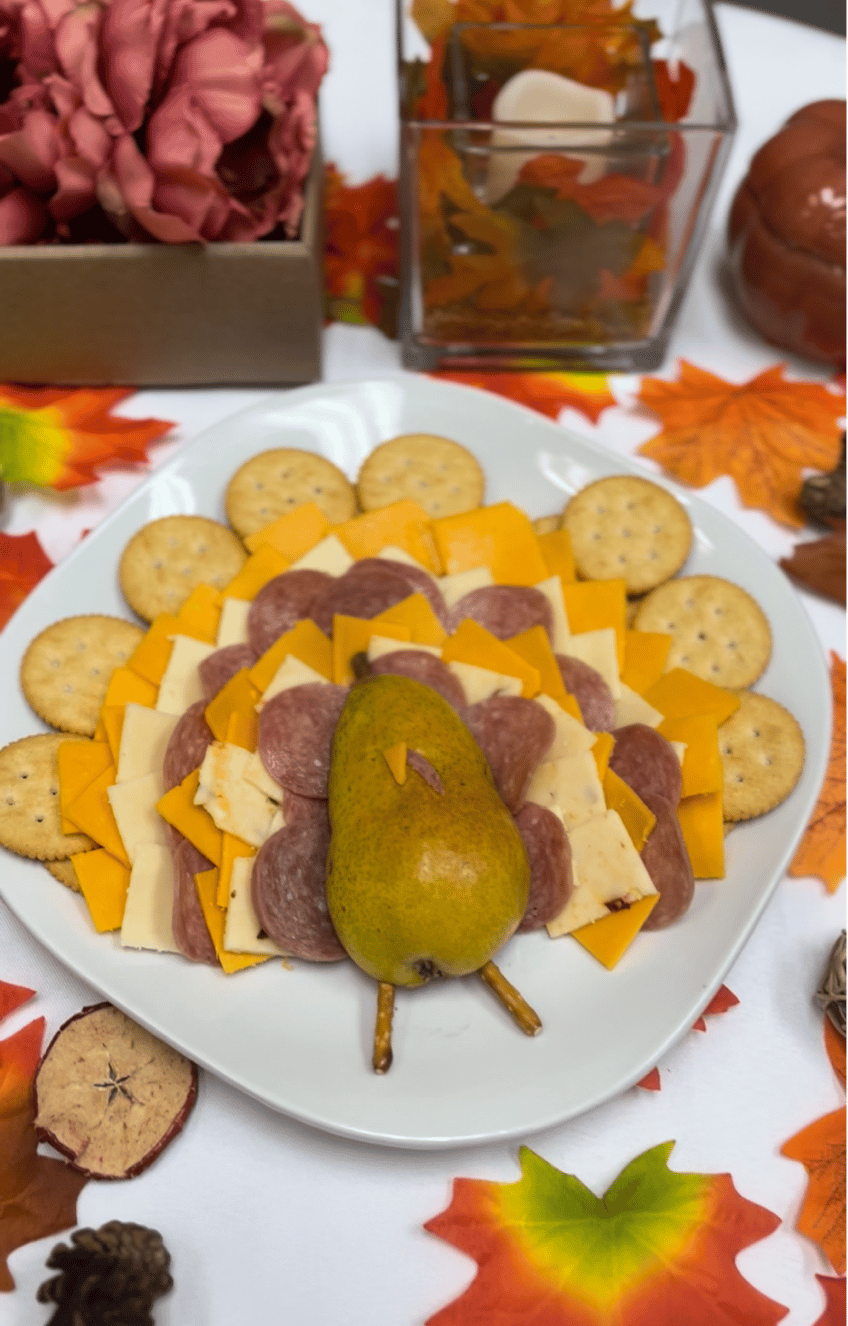
A Turkey-Shaped Charcuterie Board

Supplies needed:
1 serving platter
1 pear
1 sleeve of crackers
2 short pretzel sticks
An assortment of your favorite meats & cheeses

Step 1:
Begin by layering your crackers in a semi-circle shape around your serving platter. This will act as the base of our turkey’s feathers.

Step 2:
Next, spread a layer of cheese overtop the crackers.


Step 3:
Continue adding layers to your turkey, alternating between different kinds of cheeses and meats.

Step 4:
Once your turkey’s layers have been formed, it’s time to bring it to life! Start by cutting your pear in half. Place one half of the pear at the bottom-center of the turkey. This will be our turkey’s head and body!

Step 5:
Take your two small pretzel sticks and stick them underneath the pear, allowing a little less than half of the pretzel stick to show. Now our turkey has legs!

Step 6:
To finish, take an extra slice of cheese and cut a tiny triangle out of it. Then place it in the middle of the pear. This is our turkey’s beak! To create a gobbler hanging from our turkey’s beak, cut alongside a piece of meat and place it next to the beak. At last, our turkey friend is complete!
A Fall-Themed Hanging Wreath

Supplies needed:
A hot glue gun
A couple hot glue sticks
A pair of scissors
1 grapevine wreath of any size
An abundance of fall-colored artificial flowers & plants
1 roll of 2-inch to 3-inch ribbon of any color

Step 1:
To get started, place your grapevine wreath on a flat surface. To avoid burns or a mess from the hot glue gun, place some newspaper or an old cloth underneath. It’s also a good idea to plug in your hot glue gun to start heating up!


Step 2:
Let the creativity flow! Using different pieces of your artificial flowers and plants, place them around the grapevine wreath. You can’t go wrong with this, so design your wreath in whatever way looks best to you! As you go, make sure you remember to hot glue each piece onto the grapevine wreath to secure its spot.

Step 3:
To top it off, this wreath needs a bow! Grab your roll of ribbon and cut two, identical lengths of ribbon. While you have the scissors out, cut another stand of ribbon that is about half the length of the previous ribbons we cut. You’ll also want to cut a tiny strand of ribbon off of the roll.


Step 4:
Take one of the two identical lengths of ribbon and fold it over, overlapping the ends of the ribbon to create a loop. Glue the ends together with the hot glue gun and then place the loop on top of the second length of ribbon.

Step 5:
Pull out your tiny stand of ribbon, and while pinching the center of the two ribbons, tie the tiny strand of ribbon here to hold everything in place. After you tie, you may need to cut off excess ribbon that shows.


Step 6:
We’re getting somewhere! Now take the last strand of ribbon we cut and fold it horizontally. Next, lay this strand across the center of our previous ribbon that we pinched and tied down. Wrap the strand around the center of the ribbon and hot glue it together in the back.

Step 7:
Lastly, pull down the tails of the ribbon and spread out the loops at the top to see the finished product.


Step 8:
To finish off this fall-themed hanging wreath, pick a spot on your grapevine wreath and hot glue the ribbon on. Add any leftover artificial flowers and plants to fill in the gaps and then your wreath is ready to show off!
Festive Fall Candle-lit Centerpieces

Supplies needed:
1 medium cube glass vase
1 small cube glass vase
1 small, white, LED lit votive candle
1 pack of artificial fall-colored leaves
1 pack of golden glass beads

Step 1:
Open your pack of golden glass beads and pour them into the medium cube glass vase. Afterwards, give the medium cube glass vase a light shake to spread and even out the glass beads.

Step 2:
Take your small cube glass vase and stick it inside the medium cube glass vase. Try to center the small cube glass vase as best as you can! There should be some space in-between the two glass vases.

Step 3:
Next, begin to lay the artificial fall-colored leaves in the space between the two glass vases. Layer the leaves such as we did so that the majority of the glass vase is covered by the leaves, while still leaving a few spots for light to shine through. No need to glue the leaves down; they’ll stay in position between the two glass vases!

Step 4:
Now our centerpiece is really coming together, but we need to add the final touch! Turn on your small, white, LED lit votive candle and place in the middle of the small cube glass vase.

Step 5:
Ta da! Our festive fall candle-lit centerpiece is all done! To provide the best presentation on your Thanksgiving dinner table, we recommend making multiplies depending on how many you’d like. These are also great to throw on top the fireplace, coffee table, or kitchen counters!
There is one final secret I should let you in on. Some of the supplies needed for these DIY crafts can be found at Palmetto Goodwill! Before you spend, check-out your nearest Palmetto Goodwill store because we might have just what you need at a less expensive price. Your purchase also helps fund programs in our communities that change lives through the power of education, training and employment. Yet, we don’t need to wait until Thanksgiving to express our gratitude for that! Goodluck and happy creating!


